
Table of Contents
The Cheesecake That Makes the Whole Room Go Quiet
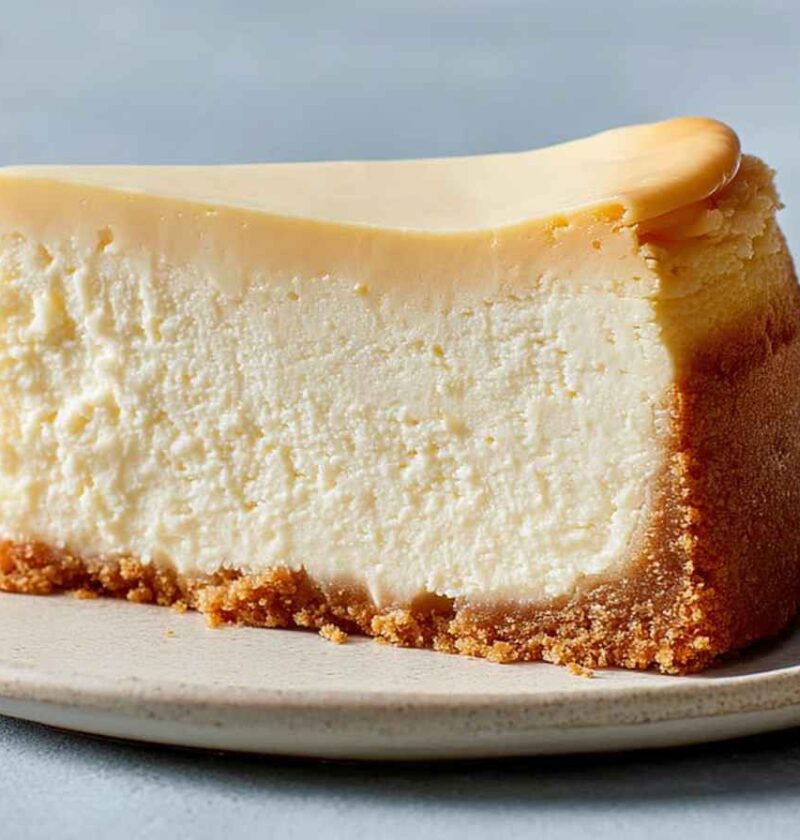
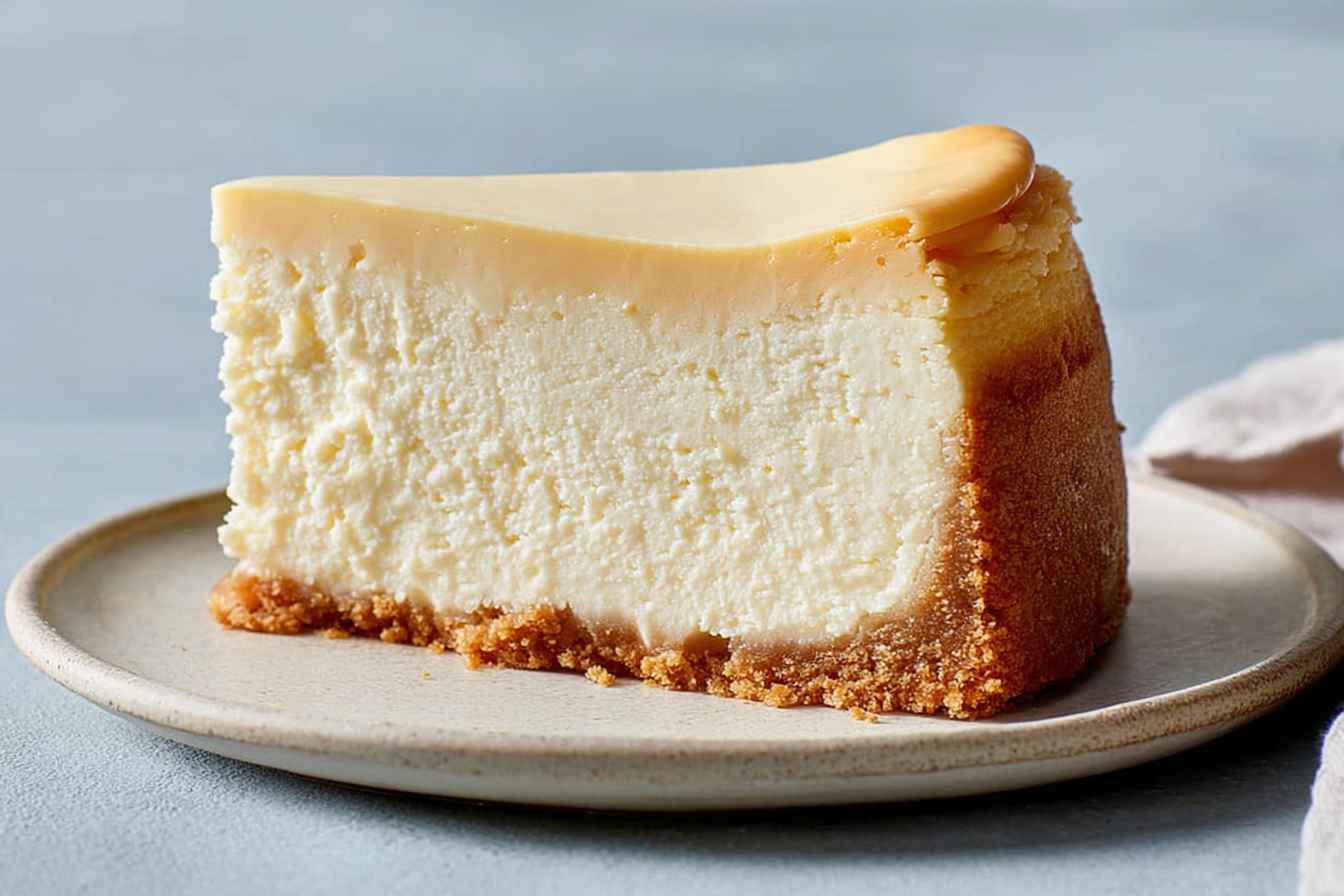
Some desserts are good. This one causes gasps. This tall and creamy cheesecake is the big, beautiful, lush centerpiece dessert that transforms any occasion into a genuine event — a dense, silky, sky-high cheesecake that stands a full 3 inches tall, rests on a buttery graham cracker crust, and delivers an impossibly smooth, rich bite from the very first slice to the very last.
This recipe is built for the home baker who wants a truly extraordinary result — not a passable weeknight dessert, but the kind of showstopper that earns recipe requests before the plates are cleared. Based on Dorie Greenspan’s legendary method, it uses a water bath and a carefully controlled bake to eliminate cracks, create a flawlessly creamy texture, and produce a cheesecake that looks like it came straight out of a high-end Manhattan bakery.
Whether you’re making it for a holiday table, a birthday celebration, or just because Tuesday deserves something magnificent — this foolproof recipe delivers every single time. Make it the day before, let it chill overnight, and walk it to the table to the sound of delighted silence.
Why You’ll Love This Recipe
- Bakery-tall and impossibly creamy — 3 inches of dense, silky cheesecake that slices like a dream
- Zero cracks, guaranteed — the water bath method is the single most reliable way to bake a flawless cheesecake
- Deep vanilla flavor throughout — vanilla bean or pure extract perfumes every single layer
- Fully make-ahead — bake it the day before and it only gets better overnight in the fridge
- Completely customizable — go tangier with all sour cream, richer with all heavy cream, or mix both
- Buttery graham crust that holds every slice — it bakes firm, slices cleanly, and never crumbles onto the plate
- Serves 16 generously — one cheesecake feeds a crowd without a second dessert in sight
Ingredients
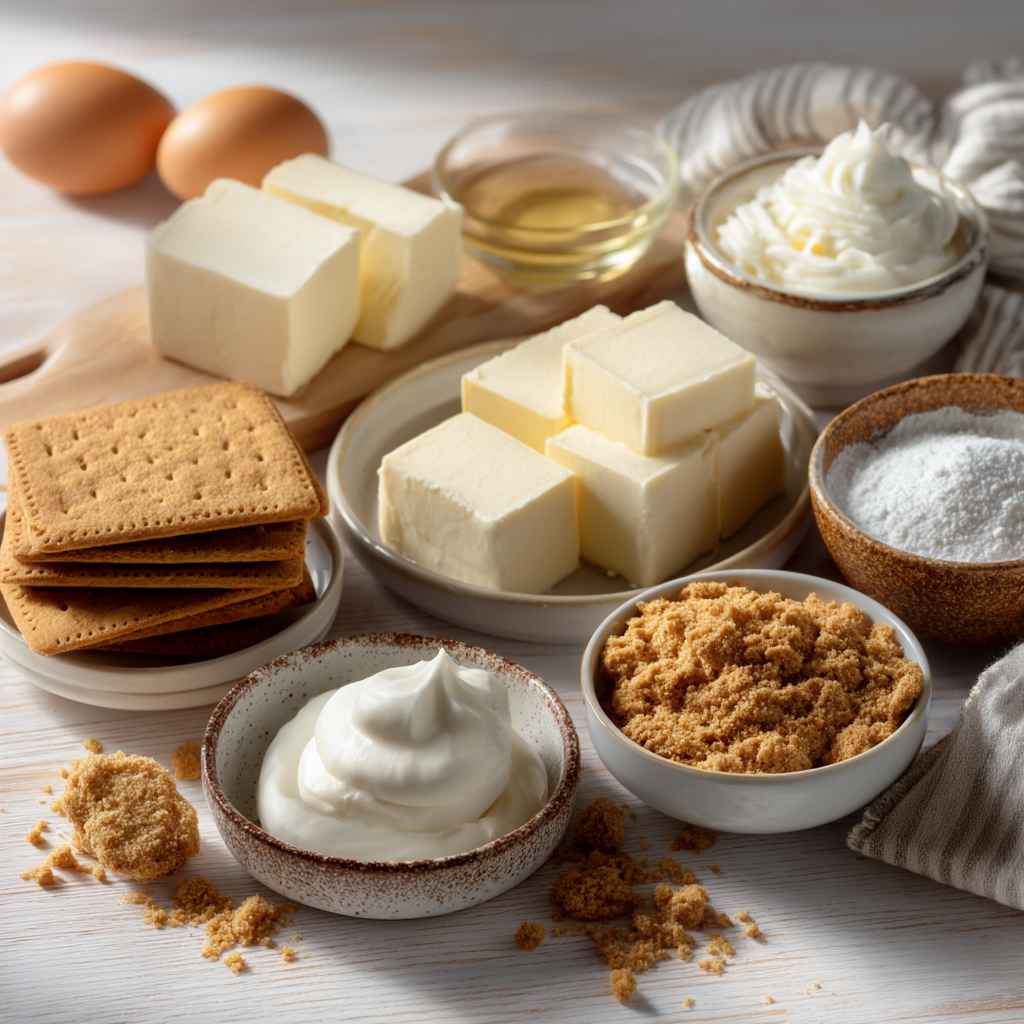
The Graham Cracker Crust
- 1¾ cups (175g) graham cracker crumbs (from about 14 full sheets)
- 3 tbsp (36g) granulated sugar
- Pinch of kosher salt
- 4 tbsp (56g) unsalted butter, melted (sub: digestive biscuits for a more British-style crust, or add ¼ cup finely chopped toasted walnuts for extra depth)
The Cheesecake Filling
- 2 lbs (900g / four 8-oz packages) full-fat cream cheese, completely at room temperature (this is the most critical step in the entire recipe — cold cream cheese creates lumps no mixer can fix)
- 1⅓ cups (265g) granulated sugar
- ½ tsp (3g) kosher salt
- 2 tsp (10ml) pure vanilla extract (sub: seeds of 1–2 vanilla beans for a more luxurious, speckled result)
- 4 large eggs, completely at room temperature
- 1⅓ cups (315ml) sour cream, heavy cream, or a combination (sour cream = tangier, slightly denser; heavy cream = milder, silkier; half-and-half combination = the best of both)Cream Cheese Note: Full-fat brick-style cream cheese is non-negotiable — tub-style cream cheese contains more moisture and produces a looser, less stable filling. Every package must be genuinely at room temperature, not just “taken out 5 minutes ago.” Pull all dairy from the fridge at least 1–2 hours before you begin.
Step-by-Step Instructions
Butter a 9-inch springform pan with sides at least 2¾ inches tall. Wrap the outside bottom and sides of the pan tightly in two layers of heavy-duty aluminum foil — this is your water bath protection and must be completely watertight.
Make the crust: Stir graham cracker crumbs, sugar, and salt together in a medium bowl. Pour the melted butter over the top and mix with your fingers until all the dry crumbs are uniformly moist — it should hold together when you squeeze a small handful.
Press the crust mixture evenly across the bottom of the springform pan and about halfway up the sides. Use the bottom of a flat measuring cup to compact it firmly and evenly. Place the pan in the freezer while you preheat the oven.
Preheat oven to 350°F (175°C). Place the springform pan on a baking sheet and bake the crust for 10 minutes until just set and barely golden. Remove and cool on a wire rack. Reduce oven temperature to 325°F (165°C). Put a full kettle of water on to boil — you’ll need it very soon.
Make the filling: Beat the room-temperature cream cheese in a stand mixer fitted with the paddle attachment on medium speed for 4 full minutes until genuinely soft and creamy. Scrape down the sides and bottom of the bowl completely. [PRO TIP: This initial beating stage determines the texture of the entire cheesecake — under-beaten cream cheese means lumps; a full 4 minutes produces a silky, lump-free base that no amount of later mixing can replicate.]
With the mixer running, add the sugar and salt and beat for another 4 minutes until the cream cheese looks noticeably lighter and very smooth. Scrape the bowl down again — those corners hide un-mixed lumps that will show up in the final texture.
Beat in the vanilla extract until just combined. If using vanilla bean seeds, add them now and mix for 30 seconds until evenly distributed throughout the batter.
Add the eggs one at a time, beating for a full 60 seconds after each addition. This one-minute-per-egg rule is critical — it incorporates each egg fully and develops the aerated, silky structure of the filling. [PRO TIP: After all four eggs are incorporated, the batter should look thick, pale, and glossy — almost like a very thick cake batter. If it looks grainy or broken, your ingredients were too cold.]
Reduce mixer speed to low and gently mix in the sour cream and/or heavy cream. Mix only until just combined — at this stage you want to incorporate the cream without whipping in excess air, which causes cracks. Finish with a few gentle folds by hand with a spatula to make sure the bottom of the bowl is incorporated.
Set the foil-wrapped springform pan in the center of a large roasting pan. Pour the cheesecake filling into the cooled crust and smooth the top with an offset spatula — it should be level and glossy. [PRO TIP: Tap the pan gently on the counter 3–4 times to bring any air bubbles to the surface, then smooth again. Surface air bubbles are what crack cheesecakes during baking.]
Carefully pour the boiling water into the roasting pan until it reaches halfway up the sides of the springform pan. Work slowly and don’t let a drop splash onto the cheesecake. The water bath creates gentle, even, steam-infused heat that eliminates the hot spots responsible for cracking and over-baking.
Bake at 325°F (165°C) for 55–65 minutes. The cheesecake is done when the outer 2–3 inches look set and matte while the center still has a distinct, slow jiggle — like loose Jell-O when you nudge the pan. It should not slosh, but it should not be fully firm either. [PRO TIP: A fully set center when it comes out of the oven means an overcooked cheesecake. That wobbly center sets completely during the cooling process — trust it.]
Turn the oven off and crack the door open 1–2 inches. Let the cheesecake cool in the oven for 1 hour. This gradual temperature drop is what prevents that dreaded surface crack — a cheesecake pulled suddenly into cold air contracts too fast and splits right down the middle.
Remove the cheesecake from the water bath and transfer to a wire rack. Run a thin knife around the very edge of the cake to release it from the sides of the pan — this also prevents cracking as it contracts further during cooling. Let it cool completely to room temperature, about 1–2 more hours.
Cover loosely with plastic wrap and refrigerate for at least 4 hours, or ideally overnight. The cheesecake must be thoroughly chilled before unmolding and slicing — it firms, sets, and develops its final silky texture entirely during this refrigeration period. [PRO TIP: A cheesecake made the day before always tastes better than one made the same day — the flavors meld and the texture reaches its absolute peak after 12+ hours of chilling.]
To serve, remove the springform ring, run a warm knife under hot water and wipe dry before each slice. A warm, clean knife glides through each piece without dragging or tearing, producing those clean, tall, restaurant-worthy slices.
Macros & Nutrition
Per serving (based on 16 servings, with graham crust and sour cream filling):
| Nutrient | Amount |
|---|---|
| Calories | 395 kcal |
| Protein | 7g |
| Total Carbs | 30g |
| Net Carbs | 30g |
| Fat | 28g |
| Fiber | 0g |
| Sugar | 24g |
Note: Macros were calculated using four 8-oz packages of full-fat cream cheese, 1⅓ cups sour cream, 4 eggs, 1¾ cups graham cracker crumbs, and 4 tablespoons butter, divided into 16 equal servings. Substituting heavy cream for sour cream adds approximately 15 kcal per slice and reduces protein slightly. For precise tracking, input your specific brands into Cronometer or MyFitnessPal.
Expert Tips, Variations & Storage
3 Tips for a Flawless, Crack-Free Cheesecake
Room temperature ingredients are not optional — they’re the recipe. Every block of cream cheese, every egg, the sour cream, and the heavy cream must all be genuinely at room temperature before you begin. Cold cream cheese creates lumps that no amount of beating can fix; cold eggs cause the filling to seize and curdle. Pull everything from the fridge 1–2 hours before baking and set it on the counter. This one habit separates consistently perfect cheesecakes from frustrating ones.
The water bath is the single best tool against cracking. It is not optional if you want a perfectly smooth, crack-free top. The boiling water creates a gentle, humid baking environment that keeps the exterior from setting faster than the interior — the mechanism behind every cheesecake crack. The foil wrap must be completely airtight; even a small leak lets water seep in and makes the crust soggy. Double-wrap generously and check the seams.
Cool the cheesecake gradually — never rush it. The crack-prevention process doesn’t end when the oven does. The oven-door-ajar cooling hour and the full room-temperature rest before refrigerating are not suggestions — they are structural steps. A cheesecake that cools too fast contracts unevenly and cracks regardless of how perfectly it baked. Patience during cooling is rewarded with a flawless surface every time.
3 Delicious Variations
Strawberry Topped Version: While the cheesecake chills, simmer 2 cups of fresh strawberries with ¼ cup sugar and 1 tablespoon lemon juice over medium heat for 8–10 minutes until jammy. Cool completely, then spoon over each slice just before serving. The bright acidity cuts through the richness of the cream cheese beautifully.
Lemon Cheesecake Version: Add 2 tablespoons of fresh lemon zest and 1 tablespoon of fresh lemon juice to the filling along with the vanilla. Replace the sour cream with heavy cream for a cleaner, lighter flavor profile. This version leans closer to a classic New York cheesecake and pairs magnificently with a blueberry compote on top.
Chocolate Swirl Version: Melt ½ cup of dark chocolate chips with 2 tablespoons of heavy cream into a smooth ganache. Drop spoonfuls over the poured filling, then drag a skewer or toothpick through in figure-eight motions to create a marbled pattern. Bake exactly as directed — the swirl sets into a gorgeous, dramatic pattern inside every slice.
Storage & Reheating
- Fridge: Store covered loosely with plastic wrap or in an airtight container for up to 5 days — flavor and texture peak on days 2 and 3
- Freezer: Freeze the unmolded, undecorated cheesecake whole or in slices, wrapped tightly in plastic then foil, for up to 2 months — thaw overnight in the refrigerator; never at room temperature
- Serving from cold: Always slice with a hot, dry knife for clean edges — dip in hot water and wipe dry between every single cut
- Make-ahead timeline: Bake Saturday → cool overnight → refrigerate all Sunday → serve Sunday night or Monday — this is the optimal window
FAQ — People Also Ask
Q: Why did my cheesecake crack on top?
A: Cracks happen for three main reasons: over-baking (the center was too set when it came out of the oven), skipping the water bath (causing uneven heat distribution), or cooling too quickly (thermal shock contracts the surface). The fix is all three preventions at once — use a water bath, pull the cheesecake while the center still jiggles, and cool it slowly in a cracked-open oven for a full hour before bringing it to room temperature.
Q: How do you know when a baked cheesecake is done?
A: The outer 2–3 inches of the cheesecake should look set and matte, while the center 3–4 inches should still have a gentle, slow wobble when you nudge the pan — like very thick Jell-O. It should not slosh or ripple, but it must not be fully firm. The center will continue setting during the gradual oven cool-down and the refrigeration period. Trusting this visual cue and not the clock is the key to a perfectly creamy interior.
Q: Do I need a water bath for cheesecake?
A: For this specific tall, dense, New York-style cheesecake, a water bath is the most reliable method for a crack-free top and evenly baked, creamy texture throughout. Without it, the exterior bakes significantly faster than the center, causing uneven texture and surface cracks. Some no-water-bath methods work with very low temperatures and no opening the oven door, but the water bath remains the most consistent and foolproof approach for a showstopper result.
Q: Can I make tall and creamy cheesecake ahead of time?
A: This recipe is specifically designed to be made ahead — it’s one of its greatest strengths. The cheesecake needs a minimum of 4 hours in the refrigerator to set, but 12–24 hours produces a dramatically better result. Make it the day before serving and refrigerate overnight uncovered for the first hour, then loosely covered. The flavor deepens, the texture firms perfectly, and the surface dries to a smooth, matte finish that slices like silk.
Q: What’s the difference between New York cheesecake and regular cheesecake?
A: New York cheesecake is characterized by its dense, firm, very tall structure, typically made with a high ratio of cream cheese, extra egg yolks, and either a small amount of heavy cream or no cream at all — producing an intensely rich, slightly tangy result. This tall and creamy version sits slightly apart — it uses sour cream or heavy cream for a softer, silkier interior than a strict New York style, making it arguably more universally crowd-pleasing while retaining that signature dramatic height.
The Dessert That Earns a Standing Ovation
Tall and creamy cheesecake is the rare dessert that rewards patience with perfection — rich, smooth, impossibly elegant, and worth every minute of the water bath setup and overnight chill. This is the recipe you reach for when the occasion demands something genuinely spectacular and the moment deserves to be remembered.
If you make this, drop a comment below and tell me what topping you went with! Save it to your dessert and baking boards on Pinterest, and tag me in your photos — nothing makes me happier than seeing a tall, crack-free slice holding its shape on a plate.
Tall and Creamy Cheesecake
This Tall and Creamy Cheesecake is the ultimate classic New York-style cheesecake — strikingly tall, impossibly smooth, and rich with pure vanilla flavor. Built on a buttery graham cracker crust and baked low and slow in a water bath, it sets up perfectly creamy with no cracks, making it the most impressive dessert you can serve.