Craving that crunchy, peanut-buttery candy bar you grew up with? This Butterfinger recipe is your go-to homemade treat. Quick, easy, and made with just a few pantry ingredients. A nostalgic candy recipe you’ll want to make again and again only from www.bbrecipes.com.
Table of Contents
Introduction
You know that perfect bite crunchy, sweet, with just a hint of salty peanut butter goodness wrapped in a velvety coat of chocolate? That’s exactly what this Butterfinger recipe delivers, and the best part is, you don’t have to run to the store to enjoy it.
Whether you’re a fan of nostalgic candy, love experimenting in the kitchen, or simply want a fun weekend baking project, this homemade Butterfinger recipe is ridiculously satisfying. And yes, it tastes just like the real thing but better. Plus, no mystery additives, no preservatives just real, simple ingredients and big flavor.
Ready to make your kitchen smell like a chocolate shop?
Ingredients
Here’s everything you’ll need for this classic candy recipe:
- 1 cup creamy peanut butter (not natural-style)
- 1 cup candy corn (yes, the secret ingredient!)
- 1 1/2 cups milk chocolate chips
- 1/2 tsp vanilla extract (optional but recommended)
- Pinch of salt (to balance sweetness)
- Optional: crushed Butterfingers or crushed cornflakes for topping
Each ingredient here plays an important role: the candy corn creates that signature crisp crunch, the peanut butter gives that rich, nutty bite, and the chocolate makes it all decadent and smooth.
Nutrition Facts (Per Piece – based on 16 servings)
- Calories: 160
- Protein: 2g
- Carbs: 22g
- Fat: 8g
- Sugar: 18g
- Sodium: 55mg
While this isn’t exactly a protein bar, this Butterfinger recipe offers an indulgent, satisfying treat great in moderation and perfect for dessert tables or holidays.
Preparation Instructions
Step 1: Melt the Candy Corn
In a microwave-safe bowl, add the candy corn. Microwave on high in 30-second increments, stirring between each, until the candy corn is fully melted and smooth (usually takes about 1 to 1.5 minutes).
Step 2: Stir in Peanut Butter
Quickly stir in the peanut butter and a pinch of salt while the candy corn is hot. Mix until fully combined. The texture will be thick and slightly grainy perfect for shaping later.
Step 3: Form the Base
Scoop the mixture into a parchment-lined 8×8-inch baking dish. Use a spatula or your hands (lightly greased or with wax paper) to press the mixture evenly into the dish. Allow it to cool completely at room temperature or chill in the fridge for 30 minutes.
Step 4: Slice and Dip
Once set, cut into bars or squares whatever size you prefer. In another microwave-safe bowl, melt the chocolate chips in 20–30 second bursts, stirring frequently until smooth.
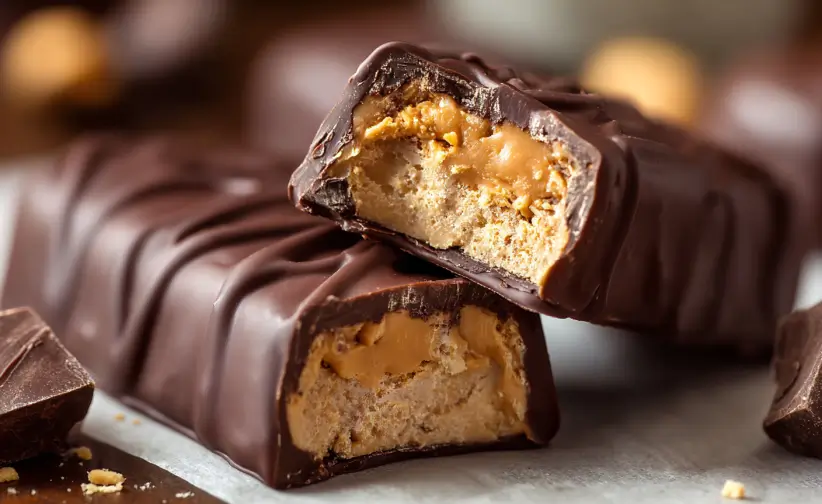
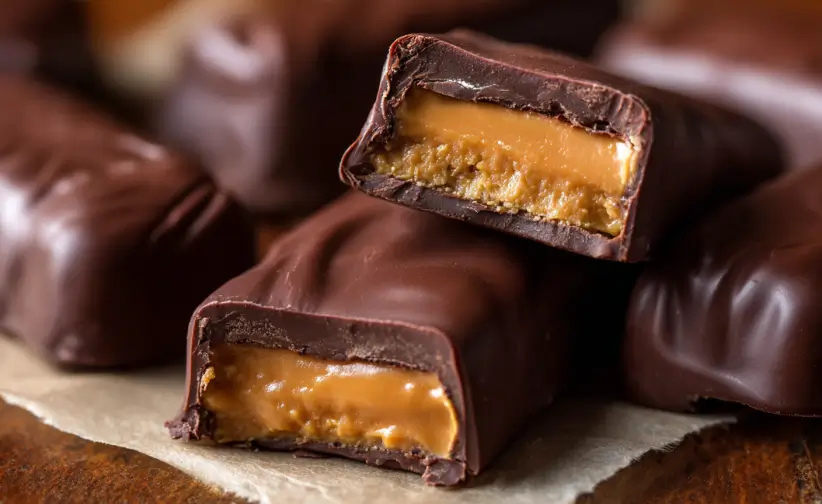
Dip each bar into the chocolate to coat. Place on parchment paper to set. You can drizzle extra chocolate on top or sprinkle with crushed Butterfingers or cornflakes for added crunch.
Step 5: Let Set and Enjoy
Let the coated bars cool until the chocolate hardens. You can speed this up by placing them in the fridge for about 15 minutes.
And there you have it homemade Butterfinger bars that snap when you bite and melt when you chew.
Serving Suggestions
This sweet dish can be enjoyed in a number of creative ways:
- Serve on a dessert platter at parties.
- Gift wrap them in parchment and ribbon for holidays.
- Crumble them over vanilla ice cream or yogurt.
- Add chunks to homemade brownies or chocolate bark.
- Use as toppings for milkshakes or cupcakes.
This recipe isn’t just a standalone candy it’s a versatile dessert enhancer.
Pro Tips
Want to really nail this Butterfinger recipe? Here are a few tried-and-true tricks:
- Use commercial peanut butter (like Jif or Skippy). Natural peanut butters with separated oils won’t give the right texture.
- Don’t overheat the candy corn, or it’ll become tough instead of smooth.
- Work quickly when mixing peanut butter and candy corn the mixture sets fast.
- Cut before dipping, not after. It’s much easier and gives cleaner results.
- Line your pan with parchment, so bars are easy to lift out and cut.
These tips ensure your bars turn out crisp, rich, and satisfying every time.
Variations
This classic Butterfinger recipe is delicious as-is, but don’t be afraid to experiment. Try these fun variations:
Chocolate Peanut Butter Cups
Pour a little melted chocolate into mini cupcake liners, add a dollop of Butterfinger filling, then top with more chocolate.
Gluten-Free Version
All ingredients in this recipe are gluten-free by default but always double-check labels to confirm, especially candy corn.
Vegan Alternative
Use vegan candy corn (available online) and dairy-free chocolate chips. Substitute peanut butter with almond or sunflower seed butter for allergy-friendly options.
Crunchy Twist
Mix in crushed cornflakes or crisped rice for added texture.
These substitutes and alternatives let you make the recipe your own while keeping the same nostalgic flavor.
FAQ
Q: Why use candy corn?
A: Candy corn melts into a unique texture that mimics the crispy interior of real Butterfinger bars it’s the key to this copycat recipe.
Q: Can I store these long term?
A: Yes! Store in an airtight container at room temperature for up to 1 week or in the fridge for up to 2 weeks. Freeze for longer storage.
Q: Can I use natural peanut butter?
A: It’s not recommended. The oils separate and affect texture. Stick with a creamy, no-stir peanut butter for best results.
Q: What chocolate is best?
A: Milk chocolate gives that classic Butterfinger flavor, but you can also use dark or white chocolate for a twist.
Q: Can kids help make this?
A: Absolutely. Just supervise during the microwave melting step, and let them have fun dipping and decorating.
Conclusion
There’s something uniquely satisfying about recreating a beloved childhood candy bar in your own kitchen and this Butterfinger recipe checks all the boxes. It’s crunchy, sweet, nutty, and cloaked in smooth chocolate, just like the store-bought version but with homemade flair.
Whether you’re baking with your kids, preparing treats for a party, or just feeding a nostalgic craving, this homemade Butterfinger recipe delivers flavor, fun, and satisfaction.
Ready to whip up your first batch? Try it today and share your results in the comments. And don’t forget to explore more sweet, easy-to-follow dessert recipes over at www.bbrecipes.com go-to kitchen companion for homemade classics.
Save this recipe, share it with fellow candy lovers, and come back for more homemade treats made simple!